Ever wish you could clone yourself? One of you to nail those SEO keywords, another to whip up killer product descriptions, and a third to be the ultimate helpful guide on your website, 24/7? While human cloning is still (thankfully) sci-fi, dotAI is the next best thing! It's like your team's new MVP – always caffeinated, always creative, and ready to make your brand shine. Let's unleash some dotAI magic!
What’s in This Guide:
Step-by-Step Setup: How to add and configure dotAI in your environment.
Including information about the different AI configuration fields to help you make the most informed decisions
Deep Dive into Settings: Understanding AI configuration fields to make informed decisions.
Developer Tools: Using the dotAI Dev Tools interface.
1. Prerequisites and System Requirements
Before getting started, we make the following assumptions:
dotCMS Version: You are using dotCMS version 24.04.05 or later
Tip: If you aren’t on a current version of dotCMS and want to stop worrying about it, consider upgrading your instance to Evergreen and always have access to the latest tools (and fun!)
Edition: You are using the dotCMS Enterprise Edition
Need to upgrade your license? Contact one of our fantastic Client Services representatives, and they will help set you on the right path.
API Access: You have a valid OpenAI API key
Permissions: Your account has the correct permissions to:
Access dotAI
Administer backend settings
Create and publish content
Skill Level: You know little to nothing about software development or writing code - that’s perfectly fine!
2. What is dotAI? An Overview
The dotAI feature is a sophisticated suite of artificial intelligence tools that enhances content management and administration across multiple disciplines within the content management lifecycle.
Key Functionalities
DotAI harnesses the potential of AI technologies to streamline a myriad of tasks. Key functionalities include but are not limited to:
Image and Text Generation: Content creators can utilize AI to instantly generate text and images, drastically reducing the time needed for content creation. This capability is embedded in the Block Editor, allowing for prompts that lead to the immediate creation of necessary content.
Automation and Workflow: dotAI automates repetitive tasks, such as generating SEO metadata and managing content workflows. It empowers content teams with AI-driven tools to ensure that all AI-generated material undergoes human review before publication, thereby maintaining quality and accuracy. With the introduction of AI workflows, users can automate complex operations like tagging and categorization across vast content libraries, thereby optimizing content management processes.
Intelligent Search and Chatbots: DotAI’s semantic search capability transforms how users retrieve information from websites. It provides a more intuitive chat-based search experience, enabling users to ask questions and receive relevant answers while enhancing overall engagement and satisfaction.
APIs and Development Tools: For developers, dotAI offers an expansive REST API and Velocity ViewTool integration, allowing for seamless incorporation of AI functionalities into headless applications and websites. This flexibility opens new avenues for building advanced, context-aware applications efficiently.
In essence, dotAI aims to elevate the content management experience by merging automation, intelligent content generation, and streamlined workflows. As a result, users benefit from improved productivity, richer content interactions, and a more cohesive approach to managing digital experiences.
3. How to Add dotAI to Your Environment
The dotAI plugin integrates powerful AI tools into your dotCMS instance, allowing new horizons of automation — content and image generation, semantic searches, workflows capable of handling nitty-gritty procedures like content tagging, and more.
Look under Dev Tools for ‘dotAI’. It could be listed in any order.

If it does not exist, and your system meets the requirements listed in the first section of this document, you may need to add dotAI to your menu. Otherwise, skip to the next step!
Adding dotAI to your menu
Go to ‘Settings’ → ‘Roles & Tools’
Expand ‘System’
Select the roles you would like to have access to dotAI. For the purposes of this guide, we will be using the CMS Administrator role

Click on ‘CMS Administrator’ to populate the panel to the right.
Select the ‘Tools’ tab at the top of the screen
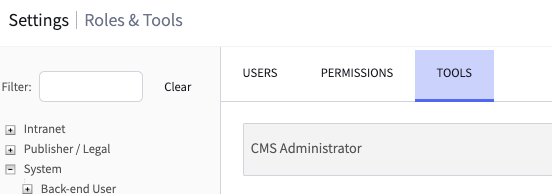
Scan the ‘Tool Group’ column until you find ‘Dev Tools’
Click on the white space to the right of the label to open the ‘Included Tools’ selection menu for that tool group
Under the ‘Tools’ dropdown, find and select ‘dotAI’
Click ‘Add’
dotAI will be added to the bottom of the list. If you would like it in a different position, you can drag and drop to change its position

Click ‘save’
Verify dotAI has been added to your included tools

Save your changes
dotAI should now be accessible through the ‘Dev Tools’ menu
4. Configuring dotAI Settings
Before we can play with the immeasurable possibilities of dotAI, we first need to configure our account.
Go to ‘Settings’ → ‘Apps’
Visually search for the dotAI app, or enter ‘AI’ in the search bar at the top of the screen
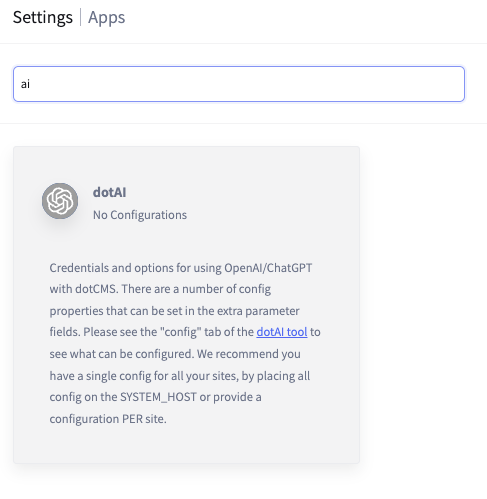
Under the dotAI configuration screen, you may see several sites listed. dotAI can be configured per site or across all sites through the ‘System Host’

How do you decide which option to use?
System Host is recommended for:
Single site implementations
When you only have one OpenAI key
When you want a multiple site implementation to have the same configuration across all sites
If you want to update all sites at the same time
By individual site is recommended for:
Each site uses its own OpenAI key
You want to configure the number of tokens, allowed models, and threshold limits on a per-site basis
You only want configuration changes to affect that specific site
Important note: Any site-level configurations will override the System Host configuration. This allows you the flexibility to control thresholds on your dotAI instance.
5. Understanding Configuration Fields
API Key: A long string of letters, numbers, and symbols provided by platform.openai.com or your company.

Model Names: A comma delimited list of OpenAI models which can be used to generate your content. Not all models are created the same, and not all models cost the same. Please make sure to verify pricing and intent before selecting your models. Currently, a full list of models can be found at: https://platform.openai.com/docs/models
These models are subject to change without notice from dotCMS as they are administered by OpenAI.
Important note: Replace all spaces with dashes. Text should be lower case. Ex: ‘GPT-4o mini’ becomes ‘gpt-4o-mini’

Role Prompt & Text Prompt
These fields are a textual representation of how you want the AI to talk to your user, or the voice you want to use when creating your content.
This is a great field to use AI to help you generate! Say your company sells travel excursions and adventure gear. You are using dotAI to write product descriptions and blog posts. You can go to your favorite AI and enter something like the following prompt:
Question: I am an avid travel enthusiast trying to sell expeditions, travel gear, and promote blog readership. I have explored the globe over and want to share the amazing things I have discovered. I want my audience to be filled with awe but to also believe embarking on a similar trip is within their grasp. What 'role prompt' should I use to achieve this?
Answer: You are a seasoned global explorer who writes with poetic passion and practical insight. Your mission is to ignite wanderlust while showing that transformative travel is possible for anyone with a spark of curiosity. Describe expeditions, travel gear, and destinations with vivid sensory detail and a sense of wonder, but always include approachable language, clear value, and real-world encouragement. Blend storytelling with useful takeaways. Make the reader feel like they’re being personally invited into the adventure—because they are.
In the above example, you would break apart the answer in the following way.

The more context and clarity you provide, the better the AI can perform. By giving it a clear direction and well-defined parameters, you'll avoid vague or rambling responses and get focused, high-quality output instead.
Performance and Rate Limits
Tokens per Minute, API per Minute, Max Tokens
These three fields are specific to your text generation model usage.
Tokens per Minute (TPM):
This parameter sets the limit on the number of tokens you can process per minute across all API requests.
Here’s a general rule of thumb according to OpenAI at the time of writing this document:
1 token ≈ 0.75 words
So, 100 words ≈ 133 tokens (on average)
Examples:
Simple English text: 100 words ≈ 70–80 tokens
Technical or complex text: 100 words ≈ 90–100 tokens
Tokens include parts of words, punctuation, and formatting symbols—not just whole words.
Requests per Minute (RPM):
This defines the maximum number of API calls you can make per minute.
While specific RPM limits can vary based on your subscription tier and usage history, they are designed to prevent abuse and ensure fair usage among all users.
Max Tokens:
This parameter determines the maximum number of tokens the model can generate in a single response.

Completion model
A type of model (like GPT-3 or GPT-4) that generates text as a continuation of a given prompt. You provide an input (prompt), and the model "completes" it with a coherent and contextually relevant output.
For example, you send a prompt:
"Write a travel blog intro about arriving in Marrakech for the first time."
The model returns a completion:
"Stepping off the plane in Marrakech felt like walking into a sun-drenched dream. The air buzzed with the scent of spices, distant calls to prayer, and the hum of scooters weaving through ancient alleyways. Within minutes, I was lost in the medina, wide-eyed at the kaleidoscope of colors, patterns, and sounds. This was the start of something unforgettable."
If you disable this setting, OpenAI will instead use a ‘Chat Model’ which is a more conversational assistant rather than a co-author to your content. We highly recommend you leave this box checked.

6. Configuring AI Image Generation
Image Model Names: Refer to “Model Names” above.

Image Prompt & Image Size: These are the default settings sent to OpenAI to generate images in a style that best fits your needs. This serves as the foundation for style and tone and can be customized as needed for individual prompts at time of creation.
If you're a travel and adventure blogger, you might use the following prompt:
A photorealistic scene with vivid colors that evoke calm, freedom, and awe — shot in ultra-high detail, like a National Geographic cover photo.
The image size dropdown is the default size in which your images will be generated. As different image generation models support different image sizes and aspect ratios, we recommend verifying these settings against the OpenAI documentation for your choice of model.

Image Tokens per Minute, Image API per Minute, and Image Max Tokens: These settings control the rate and quality of image generation through dotAI.
Image Tokens per Minute
The maximum number of tokens you can process per minute for image generation tasks.
Your specific limit depends on your subscription tier and usage history.
Image API per Minute
Sets the number of image generation requests allowed per minute. Higher values enable faster or more frequent image creation.
Maximum limits are set by OpenAI policy and subject to change.
Image Max Tokens
Defines the maximum number of tokens allowed in a single image prompt. Increasing this allows for richer and more descriptive image inputs.
High-quality images consume more tokens; for instance, a 1024×1024 image at high detail may use approximately 4,160 tokens.
Together, these fields manage how many images can be generated, how quickly, and how detailed each image can be.

Image Completion: Leave unchecked by default.

7. Embeddings and Indexes: Relate to dotAI’s Powerful Search Functionality
Embeddings Model Names: Refer to “Model Names” above.
OpenAI’s text embeddings measure the relatedness of text strings. Embeddings are commonly used for:
Search (where results are ranked by relevance to a query string)
Clustering (where text strings are grouped by similarity)
Recommendations (where items with related text strings are recommended)
Anomaly detection (where outliers with little relatedness are identified)
Diversity measurement (where similarity distributions are analyzed)
Classification (where text strings are classified by their most similar label)
Embeddings are important for the dotCMS site-search functionality. We will cover this topic more in-depth later in this guide.
Embeddings Tokens per Minute, Embeddings API per Minute, Embeddings Max Tokens: Similar to text generation above, these fields control the number of tokens used when initially reading your content to create an index, and again when your user inputs a search against the indexed content.
Indexing content happens once upon creation of the content, or when manually requested, in order to save tokens. Below is a theoretical example of running dotAI search functionality on your site.
Theoretical Example: Searching 100 Blog Articles
You have 100 blog articles you want users to be able to search.
You're using an embedding model like text-embedding-3-small (efficient and recommended).
Each article is ~500 words → ~750 tokens per article.
You want to embed all articles and then embed each user query to match against them.
Token Usage Calculation:
Initial Embedding (one-time or occasional update)
100 articles × 750 tokens = 75,000 tokens total
If your limit is, say, 100,000 tokens per minute, you can embed all articles in 1 minute.
Live Search (per user query)
Each search query = ~10–50 tokens
If you search against all 100 embedded articles:
You don’t re-embed the articles.
You just embed the query (~50 tokens), then compare it to the stored vectors.
This means live search is very light on token usage — just the query's token count — so you can handle many queries per minute.

What is a vector?
A vector is a list of floating point numbers. The distance between two vectors measures their relatedness. Small distances suggest high relatedness and large distances suggest low relatedness.
Embeddings Completion: Keep unchecked by default. Checking this box will give your dotAI assistant creative freedom. Could be interesting though…

8. Managing Content Indexes
Auto Index Content Config: A JSON map that automatically maps indexes (contentTypes) and tells dotCMS which content types should be indexed and where that content should be indexed. The list of content types is a comma separated list and can optionally include the field that should be indexed when a contentlet is published. All unpublished content will be removed from the index.
This is a more ‘code-forward’ way to manage your indexes. This is one of two ways to set automatic indexing on your content, the other being a workflow which we will cover in more detail later.
Every content type has a variable associated with it. Go to the ‘Content Model’ dropdown and click on ‘Content Types’. Here you will see a list of your content types and their variables.

Using the sample below, you can see that your index name is on the left of the : and your content type variable is on the right. You can add as many content types to each index as you would like and you can name the indexes whatever you would like. The index names are case sensitive.
{
    "default": "blog,news,webPageContent",
    "blogsOnly": "blog.blogcontent"
}
The second line of the above example shows you how to set an index on a specific field within a specific content type.
For example, if you only wanted to index the textual content of your blog and not any of the additional information such as image/author/teaser, you would use this method.
In the image below, you can see where blog.blogContent can be found.

Important note: Not all content is created the same and not all content needs to be indexed. We recommend you ask yourself: “Will the text in this content type answer a question?” If the answer is yes, throw it into an index!
If you have existing content, you will need to run the indexer through ‘Dev Tools’ → ‘dotAI’ → ‘Manage Embeddings/Indexes’ tab. We advise keeping a copy of this json available for that step.
Now hit ‘Save’ before you lose all of your changes and congratulations! You’ve made it through the configuration process!!
9. The dotAI interface: the fun part!
Go to ‘Dev Tools’ --> ‘dotAI’ on the menu
If it is not there, please refer to the section in this article titled: “Adding dotAI to your menu”

Welcome to the dotAI Dev Tools interface! This is a very useful tool when it comes to testing your search functionality, how your chatbot and AI co-author will react to prompts, and playing around with image generation.
The dotAI interface tabs
Search and Chat with dotCMS
This tab allows you to ‘chat’ with your dotAI assistant and query your content. This is a great tool for verifying your indexes contain the information you are looking for.
Content index to search: Select the index the content you would like to search is referenced in.
Response type: Type of experience you would like returned from the AI.
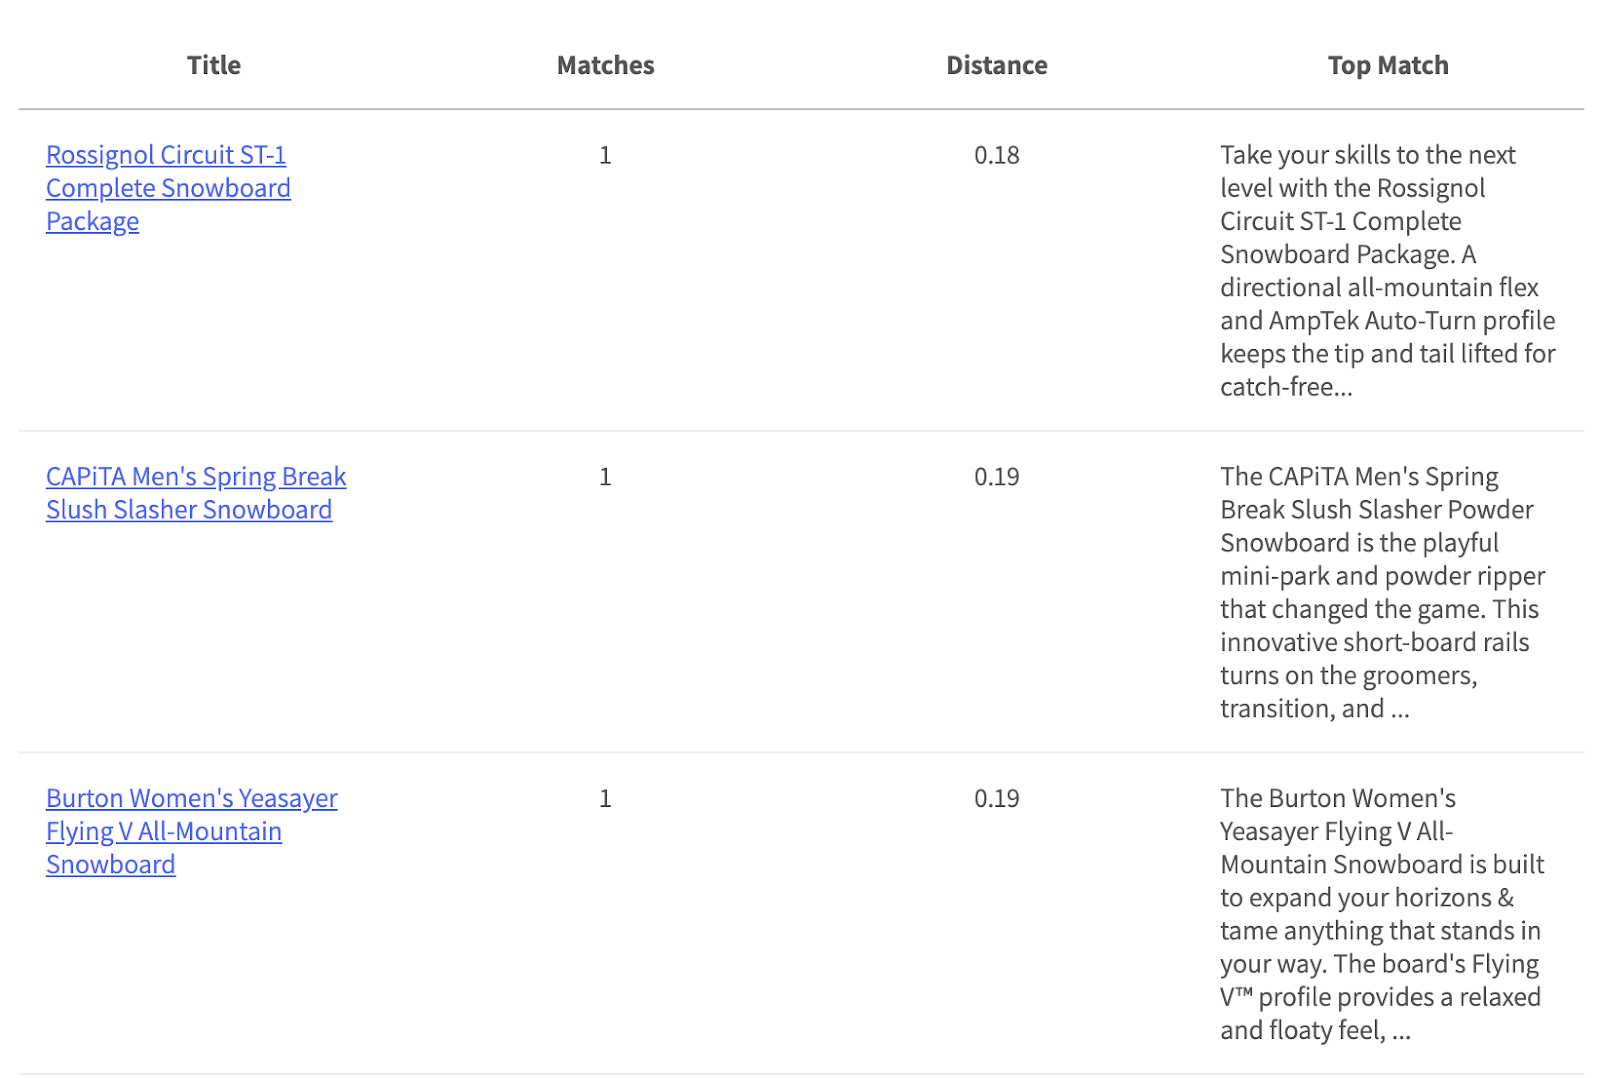
Semantic Search - only content hosted within dotCMS and referenced by your index.
For example, using the following prompt “Tell me about the most recent snowboarding supplies you have.“, the query will return results ordered by their ‘distance’ (the vector calculation done by the AI to measure relatedness of content to your query) from best matches to worst matches.
Streaming Chat - A more fluid and conversational response, this chatBot is happy to give recommendations and guidance based on a combination of content returned from OpenAI and your dotCMS index.
Using the same prompt as above, you can see that the output has a more social response.

REST/JSON Chat - (Developer forward response) Provides a fully formatted JSON response ready to be parsed by your interface. This response gives a developer the most control over where and how search results are displayed.
Using the same prompt as above, you can see that the output is a structured JSON response containing the descriptions generated by OpenAI and information linked to the referenced dotCMS content.
Image Playground (Possibly one of my personal favorite places to play around in)
This playground allows you to play around with creating images through different prompts. It takes into account the image style and tone used in your configurations. The more verbose you are in your description, the more fine-tuned your image will be.
Using the following prompt: A realistic cute white angora bunny wearing ski gear, posed on top of skis and holding ski poles in its little paws. It looks like it is about to launch down a mountain ski slope. The background should be a sparse spruce forest with new powder snow, blue sky, and friendly fluffy white clouds. – was first augmented by OpenAI and then it generated the following image.

Whereas the following, less descriptive prompt: A cute bunny wearing ski gear and skis. – was first augmented by OpenAI and then it generated the following image.

As you can see in the prompt re-writes above, the AI takes creative liberties with your description if the prompt is missing information.
On the flip-side, image prompts can be too robust as well. A prompt like the following will confuse the AI resulting in an unintended image generation.
A hyper-realistic yet cartoonish fluffy white angora bunny with neon pink fur highlights, wearing vintage 80s ski gear mixed with futuristic cyberpunk armor. It's standing mid-air above a ski slope, both holding ski poles and playing a tiny electric guitar. Its expression is both fierce and adorably innocent. The background is a dense tropical jungle with sparse snowy spruce trees, under a stormy sky that's also somehow sunny with a rainbow and a full moon visible. Add soft-focus depth of field but also keep every detail crisp and sharp.

Pro-tip: Pretend you are in English 101 and trying to meet that minimum word requirement for your final paper. Some is ok, more is better, too much is noticeable.
Note: Not all image generation models are the same. The above examples were generated with dall-e-3, but if you were to use OpenAI’s most recent image generation model gpt-image-1, it would generate something like the following image which is more realistic with a higher quality. Of course, gpt-image-1 also costs more per image generated. Please refer to OpenAI’s model information guide in order to make the most informed decision for your business needs.

Manage Embeddings/Indexes
This is one of the most important screens in your Dev Tools toolbox for dotAI. This is where you can manually create indexes and populate them. This tool is for creating new indexes, populating existing data into a new index created in the ‘Configuration’ window (‘Settings’ → ‘Apps’ → ‘dotAI’ → ‘Auto Index Content Config’ field), and verifying how much content exists in each index.
To see which content types exist in your current indexes, hover over the index name in the list. It may take a moment to populate.
For example, you have a group of activities you want to index, so your users can search through your activities and find ones that interest them. We have not previously added activity to our index.
Would you like all future ‘Activity’ content types added automatically?
Go to your dotAI configuration window
Add a new index called ‘activities’ (remember its case-sensitive!)
Add the variable associated with your ‘Activity’ content type to the json script that already exists, or create a new script.
The first index - ‘activities’ - will encompass all data related to the ‘Activity’ content type and the second index - ‘activityBody’ is linked to only the body field in the ‘Activity’ content type. This is just an example of syntax. You can add as many or as few different indexes as you would like in a comma delimited list.
Save your changes at the bottom of the configuration window
{
"activities" : "activity",
 "activityBody" : "activity.body"
}
Let’s test it: Now all future ‘Activity’ content types added will be indexed into these. Creating a new piece of content before populating existing content into your index is the best way to test your new configuration.
On the side, we’ve created a new piece of ‘Activity’ content. There were already 14 pieces of content which previously existed. When we return to the dotAI dashboard, we can see that our new indexes have been created and populated with the piece of content we’ve just created, but not the content that previously existed.

If we go back to my search tab and search for the term ‘snow bunny’, with the ‘activities’ index selected, it returns all the content associated with the full ‘Activity’ content type.

However, if we search the same phrase with the ‘activityBody’ index selected, only the information stored in the ‘body’ field is served.

And if we search for the title field inside the ‘activityBody’ index, no results will be returned.

Now that we’ve confirmed our new automatic indexes are working, it’s time to add all the pre-existing content to our indexes.
Very Important: The content you index will also index all content related to the content type you are indexing.
You index your Blog content type. Your Blog content type contains a block editor field. You write an article for your blog and reference three products (which relate to a Product content type) you are trying to sell. When this page is indexed, the associated products will also be indexed, regardless if you selected the Product content type as part of your index.
Manually populating indexes
Above, our new indexes were created automatically when we populated our first piece of content. But what if we want to populate an index as a one-time thing, or re-populate/add existing content to an index? To accomplish this, we will head back over to the ‘Manage Embeddings/Indexes’ tab.

To create a new index:
Replace the ‘Index Name’ field with the name of your new index.
It must be unique from your already existing indexes.
This field is case-sensitive.
In the ‘Content to index by Query’ box, enter the content you would like to index
For example ‘+contentType:{{variable name}}’ as written in the image above.
Selecting ‘Add to Index’ radio button (selected by default) will create your new index.
Press the ‘Build Index’ button and it will create your new index and populate it with the information entered in your query.
If you would like to create an index for a specific field inside of your content (ex. activity.body)
Expand the ‘Advanced’ field
Scroll down until you find the ‘Or Field Variable(s)’ field
Enter the specific field’s variable name in the box
Click ‘Build Index’ at the top

To populate or update an existing index:
Follow all the steps above
Your ‘Index Name’ and/or ‘Field Variable(s)’ must be exact matches to the names of your current index - case sensitive - or the control will create a new index.
To delete an index:
To delete the entire index and all the content contained within it → Select ‘delete’ on the right hand side of the screen next to the index.

To remove a specific content type from an index:
In the ‘Index Name’ field, enter the index name you would like to remove your content type from. Index names are case sensitive.
In ‘Context to Index by Query’ enter the variable name of the content type you would like to remove
Check the ‘Delete from Index’ radio button
If you are removing a specific field, ‘activity.body’ for example, enter the field name at the bottom of the advanced area ‘Field Variable’
‘Default’ contains our ‘Activity’ content type in an index. We want to remove only activity from that index and none of the other content.

Select ‘Delete from Index’

Your content should be reduced after removing the content type. If there was only one content type in the index, the index itself will also be deleted.
Config Values
This is a textual representation of the settings entered during configuration of your dotAI application. They can be changed by going to ‘Settings’ → ‘Apps’ → ‘dotAI’
